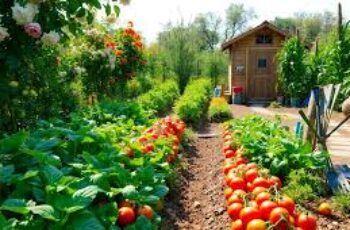
There’s something deeply satisfying about digging your hands into soil and pulling out potatoes you grew yourself. It feels like unearthing buried treasure – and in a way, it is. Homegrown potatoes taste nothing like store-bought ones. They’re creamier, more flavorful, and come in varieties you’ll never find at the grocery store.
I was intimidated by growing potatoes at first. They seemed complicated with all the talk about hilling, chitting, and different planting methods. But once I actually tried it, I discovered potatoes are remarkably easy and incredibly productive. A small patch can yield pounds and pounds of potatoes – enough to feed a family for months.
My first potato harvest was modest but revelatory. I planted maybe ten pounds of seed potatoes in early spring and harvested over fifty pounds of beautiful, delicious potatoes by midsummer. The next year I expanded my potato patch, and now I grow several different varieties every season, storing them through winter.
This guide covers everything you need to know to grow abundant potatoes at home, whether you have garden space, raised beds, or just containers on a patio.
Understanding Potato Varieties
Choosing the right potato varieties makes a huge difference in your success and satisfaction. Potatoes aren’t just potatoes – they vary dramatically in flavor, texture, growing season, and use.
Early-season varieties mature in 70-90 days. They produce smaller plants with smaller potatoes but give you that first harvest of new potatoes earlier. Varieties like Yukon Gold, Red Norland, and Irish Cobbler fall into this category.
I always plant some early varieties for that first harvest of tender new potatoes in late spring or early summer. There’s nothing quite like new potatoes with butter and fresh herbs.
Mid-season varieties take 90-110 days and produce good yields of medium to large potatoes. These are versatile varieties good for most uses. Kennebec, Chieftain, and Viking are reliable mid-season choices.
Late-season varieties need 110-130 days but produce the largest yields of the biggest potatoes. They’re excellent for storage. Russet Burbank, Katahdin, and German Butterball are popular late varieties.
Specialty varieties include fingerlings (small, elongated potatoes), colorful varieties (purple, blue, red), and heirloom types with unique flavors. These are fun to experiment with once you’ve mastered the basics.
I grow at least one specialty variety every year. Purple potatoes particularly delight dinner guests who aren’t expecting purple mashed potatoes.
Determinate vs. Indeterminate matters if you’re using certain growing methods. Determinate varieties set all their tubers at one soil depth. Indeterminate varieties continue producing tubers up the stem as you hill soil around plants, potentially increasing yields.
Most modern varieties are determinate. Heirloom varieties are often indeterminate and respond better to deep hilling.
Obtaining Seed Potatoes
You need “seed potatoes” to grow potatoes – these are small potatoes specifically grown for planting, not the ones from the grocery store.
Never use supermarket potatoes for planting. They’re often treated with sprout inhibitors and may carry diseases. Even if they sprout, they rarely produce well.
Buy certified seed potatoes from garden centers, farm supply stores, or mail-order sources. “Certified” means they’re guaranteed disease-free and true to variety.
I order my seed potatoes in late winter for early spring delivery. Selecting varieties is half the fun – there are hundreds to choose from.
Seed potato size varies from marble-sized to tennis-ball sized. Small ones (golf ball size) can be planted whole. Larger ones should be cut into pieces with at least two eyes (the small indentations that become sprouts) per piece.
Chitting (pre-sprouting) seed potatoes speeds growth and increases yields. Place seed potatoes in a cool, bright location four to six weeks before planting. They’ll develop short, stubby sprouts.
I chit all my seed potatoes now. The earlier emergence and stronger initial growth are worth the small extra effort.
When to Plant Potatoes
Timing matters significantly for potato success. They need cool soil temperatures to start but warm weather to grow.
Plant in early spring as soon as soil can be worked – typically two to four weeks before your last frost date. Soil temperature should be at least 40°F, ideally 45-50°F.
Potatoes tolerate light frosts on their foliage, though severe freezes damage plants. The tubers forming underground are protected from light frosts.
I plant my first potatoes as early as soil is workable, usually mid-March. Even if a late frost nips the foliage, plants recover quickly.
Plant in late summer for fall harvest in areas with mild winters (zones 8-10). This avoids the heat of summer which stresses potato plants.
Avoid planting when soil is too warm (above 80°F). Hot soil reduces yields and increases disease problems. This is why summer planting doesn’t work in most areas.
Consider day length if you’re really optimizing. Potatoes prefer long days for foliage growth but shorter days trigger tuber formation. This is why they naturally perform best when planted in spring for summer harvest.
Preparing Soil for Potatoes
Potatoes aren’t particularly fussy about soil, but preparing it properly increases yields significantly.
Loose, well-draining soil is essential. Potatoes develop underground and need space to expand. Compacted or heavy clay soil produces misshapen, small tubers.
I prepare potato beds by loosening soil to at least 12 inches deep. This allows tubers to develop without restriction.
Slightly acidic soil (pH 5.0-6.5) is ideal. Potatoes tolerate acidic conditions better than most vegetables. In fact, slightly acidic soil helps prevent scab disease.
Avoid heavily fertilizing with nitrogen before planting. Too much nitrogen creates lush foliage at the expense of tuber production. Potatoes need balanced nutrition, not excessive nitrogen.
I work a few inches of compost into potato beds before planting, plus a balanced fertilizer. This provides adequate nutrition without overdoing nitrogen.
Don’t add lime to potato beds even if your soil is acidic. Potatoes actually prefer acidic conditions, and raising pH can increase scab problems.
Ensure good drainage. Waterlogged soil causes tubers to rot. If drainage is questionable, grow potatoes in raised beds or hills.
Planting Methods
Several planting methods work well. Choose based on your space, soil, and preference.
Traditional Trench Method
This is how I plant most of my potatoes. It’s simple and effective.
Dig trenches 4-6 inches deep and 12 inches wide. Space trenches 2-3 feet apart.
Place seed potatoes (whole or cut pieces) 10-12 inches apart in trenches with sprouts facing up.
Cover with 3-4 inches of soil. Don’t fill trenches completely – you’ll add more soil as plants grow (this is called “hilling”).
Water thoroughly after planting.
As plants grow and reach 6-8 inches tall, pull soil from between rows to create hills around stems, covering lower leaves. This provides room for more tubers to form and protects developing potatoes from light (which turns them green and toxic).
I hill my potatoes 2-3 times during the growing season as plants continue growing.
Raised Bed Method
Raised beds work excellently for potatoes, especially if your soil is heavy or drainage is poor.
Fill beds with loose, amended soil at least 12 inches deep.
Plant seed potatoes 4-6 inches deep, spacing them 10-12 inches apart in all directions.
As plants grow, add more soil or compost around them, gradually filling the bed higher. This extends the rooting zone and increases yields.
Container Growing
Potatoes grow surprisingly well in containers – perfect for patios or small spaces.
Use large containers – at least 10-15 gallons. Bigger containers produce more potatoes.
Ensure drainage holes in the bottom. Potatoes need well-draining conditions.
Fill containers one-third full with potting mix. Place 2-3 seed potatoes on the soil.
Cover with 4 inches of soil. As plants grow, continue adding soil until the container is full, leaving only the top few inches of foliage exposed.
I grow potatoes in large fabric grow bags on my deck. Each bag produces 5-10 pounds of potatoes in a space barely two feet square.
Straw/Hay Method
This no-dig method is easier on the back but requires lots of mulch material.
Place seed potatoes on soil surface or in shallow trenches.
Cover with 6-8 inches of straw or hay immediately.
As plants grow, add more straw around them.
At harvest, simply pull back straw to reveal potatoes lying on the soil surface.
I’ve tried this method and found it produces smaller yields than trenching, but it’s incredibly easy and makes harvesting fun.
Caring for Growing Potatoes
Potatoes need relatively simple care once planted, but these practices maximize yields.
Water consistently, especially after tubers begin forming (usually when plants flower). Potatoes need about 1-2 inches of water weekly.
Inconsistent watering – alternating between dry and wet – causes cracked, knobby potatoes. Maintain even moisture throughout the growing season.
I water my potatoes deeply twice weekly during dry periods, more frequently during peak tuber formation.
Mulch around plants once hilling is complete. This conserves moisture, moderates soil temperature, and suppresses weeds.
Hilling is critical for good yields and protecting tubers from light. As plants grow, pull soil up around stems several times, covering lower leaves.
I hill potatoes when plants reach 6-8 inches tall, again at 12 inches, and sometimes once more if they’re particularly vigorous.
Fertilize lightly during the growing season. When plants are about 6 inches tall, side-dress with compost or balanced fertilizer.
Avoid high-nitrogen fertilizers which create foliage at the expense of tubers.
Control weeds which compete for nutrients and water. Mulching helps enormously with weed suppression.
Watch for flowering which signals tuber formation is underway. This is when consistent water becomes most critical.
Common Potato Problems
Potatoes face several common problems, most of which are preventable.
Colorado potato beetles are the most serious pest. These yellow-and-black striped beetles and their larvae defoliate plants rapidly.
Hand-pick beetles and crush egg clusters on leaf undersides. For severe infestations, organic sprays containing Bt or spinosad work well.
I check my potatoes daily during peak beetle season (early summer) and remove any beetles or eggs I find. This vigilance keeps them under control without sprays.
Late blight is the disease that caused the Irish potato famine. It appears as dark spots on leaves that spread rapidly during cool, wet weather.
Prevent by planting certified seed potatoes, ensuring good air circulation, and avoiding overhead watering. If it appears, remove affected plants immediately to prevent spread.
Early blight causes dark concentric spots on lower leaves. It’s less severe than late blight but still damages plants.
Remove affected leaves and ensure adequate spacing for air circulation.
Scab causes rough patches on potato skin. It’s more common in alkaline soil or when fresh manure is added before planting.
Maintain slightly acidic soil and avoid fresh manure. Scabby potatoes are still edible – just peel thicker.
Green potatoes result from tubers being exposed to light. Green areas contain solanine, which is toxic.
Prevent by hilling adequately and harvesting before potatoes are exposed. Cut away any green areas before eating.
Harvesting Potatoes
Knowing when and how to harvest affects both yield and storage life.
New potatoes can be harvested anytime after plants flower. Gently dig around plants and remove a few small potatoes, leaving the plant to continue growing.
I harvest new potatoes for special meals starting about 10 weeks after planting. They’re incredibly tender and delicious.
Main harvest happens when plants die back naturally. Foliage turns yellow and begins drying. Wait about two weeks after plants die before harvesting.
This allows potato skins to “set” (thicken), which improves storage life.
Harvest carefully to avoid damaging tubers. I use a digging fork, working from the side to lift plants gently. Damaged potatoes don’t store well and should be eaten first.
Cure potatoes before storage by leaving them in a cool, dark place with good air circulation for two weeks. This heals minor cuts and further thickens skins.
Storage conditions matter greatly. Store potatoes in a cool (40-50°F), dark, humid location. Warmer temperatures cause sprouting. Light causes greening. Low humidity causes shriveling.
I store my harvest in paper bags in a cool basement corner. They keep for months under these conditions.
Don’t refrigerate potatoes. Cold temperatures convert starches to sugars, affecting flavor and cooking quality.
Check stored potatoes regularly and remove any that are sprouting or rotting. One bad potato can spoil others around it.
Succession Planting and Extended Harvest
Several plantings extend potato harvest over months.
Plant early, mid, and late varieties at the same time for harvests spread across the season.
Make multiple plantings of the same variety two weeks apart for continuous harvest.
Harvest selectively by taking new potatoes from some plants while letting others mature fully.
I plant potatoes in three waves – early spring for early summer harvest, late spring for fall harvest, and in southern gardens, late summer for winter harvest.
The Joy of Growing Your Own Potatoes
Few vegetables provide the satisfaction of potatoes. The harvest feels abundant – digging up pounds and pounds of food from relatively small spaces. The varieties available to home gardeners blow away what stores offer. And the flavor of freshly dug potatoes surpasses anything you can buy.
Potatoes are also remarkably forgiving. They tolerate various soil conditions, don’t need perfect care, and still produce usable crops even when conditions aren’t ideal. This makes them perfect for beginning gardeners building confidence.
Start with certified seed potatoes of a variety that appeals to you, plant them in loose soil when temperatures are right, hill them as they grow, and water consistently. Do these basics and you’ll harvest more potatoes than you expect.
That first harvest when you dig into the soil and uncover potato after potato – golden, red, purple, or russet – will hook you on growing your own. Welcome to the incredibly rewarding world of homegrown potatoes!