Here’s something I wish someone had told me when I started gardening – buying cheap tools that break after one season actually costs you more money than buying decent ones that last for years. I learned this lesson the expensive way, replacing the same pruners three times in two years because I kept buying the cheapest ones I could find.
But here’s the thing – you also don’t need to buy the most expensive, professional-grade tools either. There’s a sweet spot in the middle, and once you know what to look for, choosing good tools becomes pretty straightforward.
And then there’s maintenance. I used to just toss my tools in the shed after using them, covered in dirt and sometimes mud. They rusted, got dull, and broke way faster than they should have. Now I spend literally five minutes after each gardening session taking care of my tools, and they last forever.
Let me share what I’ve figured out about choosing quality tools and keeping them in good shape. Your future self (and your wallet) will thank you.
Choosing Quality Garden Tools – What Actually Matters
The Handle Makes a Huge Difference
I used to think handles were just handles, you know? Turns out, the handle can make or break a tool – literally. I’ve had handles snap, crack, and give me blisters. Not fun.
For wood handles:
- Look for ash or hickory – they’re strong and flexible
- The grain should run along the length of the handle, not across it (this makes it way stronger)
- Should be smooth with no rough spots or splinters
- Check for cracks or knots – those are weak points
For fiberglass handles:
- Super durable and won’t rot
- A bit more expensive but worth it for tools you use a lot
- Should have a comfortable grip
- Won’t absorb water like wood does
For plastic/composite handles:
- Lightweight and cheap
- Okay for small hand tools
- Not great for tools where you need leverage (like spades)
- Can get brittle over time, especially in cold weather
I’ve mostly switched to fiberglass handles for my main tools. They’re tough, comfortable, and I don’t have to worry about them rotting if I accidentally leave them outside (which… happens more than I’d like to admit).
Metal Parts – Don’t Compromise Here
The blade or working part of your tool is where you really shouldn’t cheap out. Low-quality metal bends, breaks, or gets dull super fast.
What to look for:
- Stainless steel is awesome – doesn’t rust, stays sharp, lasts forever
- Carbon steel is strong and holds an edge well, but needs more maintenance to prevent rust
- Forged metal is stronger than stamped metal (you can usually tell by the weight and thickness)
- Check where the metal connects to the handle – this is a common break point
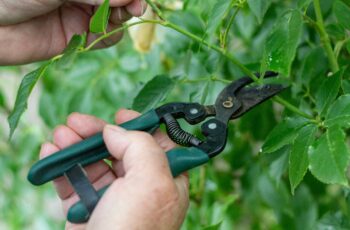
For tools like pruners and shears, the blade should close smoothly without wobbling or catching. If it feels loose or sticky in the store, it’s not going to get better with use.
Weight and Balance Matter More Than You’d Think
A tool that’s too heavy will tire you out fast. A tool that’s too light might not be sturdy enough for the job. And if the balance is off, it’ll feel awkward no matter what.
When you’re at the store, actually pick up the tool and hold it like you’d use it. Does it feel comfortable? Is the weight distributed well? Can you imagine using it for 20 minutes without your arm getting tired?
I made the mistake of buying a really heavy spade once because I thought heavier meant stronger. It did… but it also meant I could barely use it for more than ten minutes before needing a break. Sold it at a garage sale and got one that was still strong but actually usable.
Brand Names vs. Store Brands
Okay, real talk – you don’t always need the fancy brand name tools. But you also shouldn’t just grab the absolute cheapest thing on the shelf.
I’ve found that mid-range tools from decent brands usually offer the best value. Companies like Fiskars, Corona, and DeWit make solid tools that aren’t crazy expensive but will actually last.
That said, I’ve also found some great tools from store brands. The key is looking at the actual construction – check the materials, test the feel, and read reviews if you’re buying online.
The “Lifetime Guarantee” Trap
Some tools come with lifetime guarantees, which sounds great. But read the fine print. Does “lifetime” mean your lifetime or the expected life of the tool? What’s actually covered? Do you have to pay shipping to return it?
I’ve had better luck just buying well-made tools from the start than relying on warranties. If a tool breaks in normal use, a good company will usually replace it anyway, warranty or not.
Maintaining Your Tools – It’s Easier Than You Think
The After-Use Routine (Takes 5 Minutes, Saves You Hundreds)
This is my routine after every gardening session, and it’s made such a difference:
1. Knock off the big dirt Just bang the tool against the ground or your shoe to get the chunks of dirt off. Takes like 10 seconds.
2. Spray with water I keep my garden hose near the shed. Quick spray to get the rest of the dirt off all my tools.
3. Dry them off I keep an old towel hanging in the shed. Just a quick wipe to dry the metal parts. This one step alone prevents so much rust.
4. Put them away properly Hanging tools on the wall or in a rack keeps them organized and prevents handles from rotting on damp ground.
That’s it. Seriously. Four simple steps that take hardly any time, and my tools look almost as good as the day I bought them, years later.
Deep Cleaning (Once a Season)
A few times a year, I give my tools a more thorough cleaning:
The process:
- Scrub off any stubborn dirt or rust with a wire brush
- For rusty spots, I use steel wool or sandpaper
- Wipe down with an oily rag (any oil works – motor oil, vegetable oil, WD-40, whatever)
- Check for loose screws or bolts and tighten them
- Sharpen blades that need it (more on that in a sec)
I usually do this at the end of fall before storing tools for winter, and again in spring before the growing season starts.
Sharpening Blades – Not as Scary as It Sounds
Sharp tools make gardening so much easier and safer. Dull blades crush stems instead of cutting cleanly, and you have to use more force which increases the chance of slipping and hurting yourself.
For pruners and shears: I use a small sharpening stone. Just run it along the beveled edge of the blade a few times at the same angle. There are tons of YouTube videos showing exactly how to do this – it’s way easier than it sounds.
For spades and hoes: A file works great. Just sharpen the cutting edge at about a 45-degree angle. You’re not trying to make it razor-sharp, just remove any nicks and restore the edge.
If you’re not comfortable sharpening tools yourself, most hardware stores offer sharpening services pretty cheap.
Oil and Lubrication
Moving parts need oil to work smoothly. Pruners, shears, and loppers especially benefit from a drop of oil on the pivot point every now and then.
I also wipe down all metal parts with an oily rag before storing tools for winter. Creates a protective coating that prevents rust.
My trick? I keep a bucket of sand mixed with motor oil in my shed. After cleaning tools, I stick them in the sand a few times. It cleans, oils, and protects all in one step. Super easy and works great.
Proper Storage Makes a Difference
Where and how you store tools affects how long they last:
Good storage practices:
- Keep tools dry – moisture leads to rust and rotting handles
- Hang tools up rather than leaving them on the ground
- Store sharp edges covered or facing away from where you walk
- Keep tools out of direct sunlight (UV damages wooden handles and some plastics)
- If possible, store in a shed or garage rather than outside
I hung a simple pegboard in my shed with hooks for all my tools. Cost maybe twenty bucks and has kept everything organized and in good shape for years.
Winter Storage (If You Live Somewhere Cold)
Before winter, I give my tools extra attention:
- Extra thorough cleaning
- Oil all metal parts
- Check wooden handles for cracks and treat with linseed oil if needed
- Store somewhere where they won’t freeze and thaw repeatedly
- Drain and store hoses properly so they don’t crack
I learned about the hose thing the hard way. Left it outside my first winter and it cracked in like five places. Had to buy a new one in spring.
When to Replace vs. Repair
Sometimes tools are worth fixing, sometimes they’re not:
Worth repairing:
- Quality tools with minor damage
- Loose handles that can be tightened or replaced
- Dull blades that just need sharpening
- Rusty tools that are still structurally sound
Time to replace:
- Cheap tools that break (fixing them costs more than replacing)
- Cracked or broken blades
- Severely rusted tools with structural damage
- Tools that don’t work properly even after repairs
I had a great pair of loppers where just the handle broke. Replaced the handle for 10 bucks rather than buying new $40 loppers. But when my cheap trowel bent in half? Into the trash it went.
The Long-Term Payoff
Here’s the thing – taking care of your tools feels like extra work at first. But it becomes second nature pretty quickly, and the payoff is huge.
I’ve had some of my tools for over five years now, and they work just as well as when I bought them. Meanwhile, my neighbor buys new pruners every year because his keep breaking or getting too rusty to use.
Good tools that are well maintained don’t just last longer – they actually make gardening more enjoyable. Sharp pruners cut cleanly. Clean spades dig smoothly. Well-oiled shears don’t fight you with every cut.
Plus, there’s something satisfying about opening your shed and seeing all your tools clean, sharp, and ready to go. Makes you actually want to get out there and garden.
Quick Reference Guide
After every use:
- Knock off dirt
- Spray with water
- Dry metal parts
- Store properly
Monthly during growing season:
- Check for rust spots
- Tighten any loose parts
- Apply oil to moving parts
Seasonally:
- Deep clean
- Sharpen blades
- Check handles for damage
- Oil wooden handles
Before winter storage:
- Thorough cleaning
- Extra oiling of metal parts
- Proper storage away from elements
Bottom Line
Choosing quality tools and maintaining them isn’t complicated or time-consuming. You just need to know what to look for and develop a simple routine for keeping them clean and functional.
The money you save by not replacing tools every year more than makes up for the few extra minutes of maintenance. Plus, good tools that are well cared for make gardening easier and more enjoyable.
Start with quality basics, take care of them, and they’ll take care of you for years to come. It’s one of the best investments you can make in your garden.
)